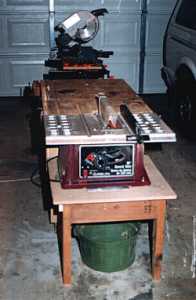
This picture shows how I manage in a 2 car garage with one car removed. In the foreground is the 10" table saw followed by my all purpose bench and my Mitre saw is in it's usual place on the folding bench at the back. I have found that the best thing I ever made was my moveable bench. Originally designed somewhat along the lines of the one made by Norm Abram on 'The New Yanke Workshop' it had to be altered quite a bit to include more uses. Norm's router table is really great but unlike him most of us do not have a barn for a workshop.
|
 I
already had one of those foldable benches which are handy if you have nothing
else. I
already had one of those foldable benches which are handy if you have nothing
else.
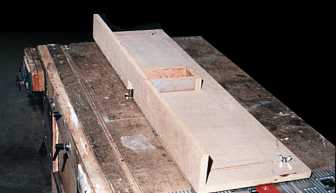
I made the height match the folding bench. The top is made of 3/4 ply with 1/4 hardboard glued to it. This made it possible to have a drop in piece for the router and I also fitted a reciprocating saw. It is heavy duty and will take all sizes of blades making it almost as good as a band saw. I have a heavy duty power cord which plugs into an outlet and brings electricity to the bench. It feeds an outlet for the saw and other power tools and also an outlet in the router space which is controlled by safety switch on the front of the bench. Being safety conscious I made this switch myself. It cannot be turned on accidentally and can be turned off easily ( even with a bump from the hip) |
 The
front edge of the top has a 1 1/4" x 4" piece of solid wood to give a substantial
surface to attach a small vice. The
front edge of the top has a 1 1/4" x 4" piece of solid wood to give a substantial
surface to attach a small vice.
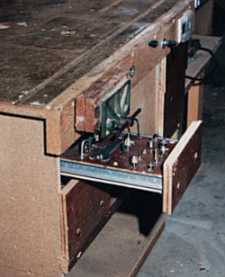
Underneath there are two drawers at each end for bits, saw blades, glue blocks, etc. etc. A large space below stores the router or reciprocating saw when not in the bench and also drills etc. |
| A removable platform with legs attaches to one end of the bench and holds my 10" table saw level with the top. I had to make a couple of concessions when fitting the table saw. I wanted it flush to the end so had to cut into the bench to allow for the saw's safety guard. I also routed out continuing grooves for the saw's miter guide and while I was at it I routed a groove end to end so that the saw's mitre guide could also be used with the router. |
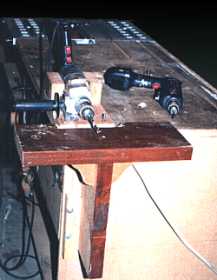 On
the back corner of the bench is where I made a removeable holder for my
1/2" drill. It attaches easily with wing nuts. The adjustable shelf on
the end of the bench makes dowelling etc. extremely easy and accurate.
While the drill is in this position I also use a sanding disk and I have
a 4" grinding wheel for tool sharpening. On
the back corner of the bench is where I made a removeable holder for my
1/2" drill. It attaches easily with wing nuts. The adjustable shelf on
the end of the bench makes dowelling etc. extremely easy and accurate.
While the drill is in this position I also use a sanding disk and I have
a 4" grinding wheel for tool sharpening. |
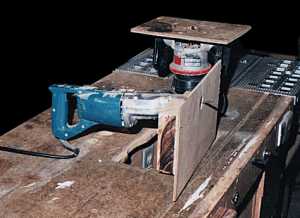
 A
Router guide fence can be fixed to the top of the bench with wing nuts.
It has the vacuum assembly attached which was one of Norm Abrams ideas.
Dust travels through a hole in the top of the bench and is vacuumed out
at the back of the bench. A
Router guide fence can be fixed to the top of the bench with wing nuts.
It has the vacuum assembly attached which was one of Norm Abrams ideas.
Dust travels through a hole in the top of the bench and is vacuumed out
at the back of the bench. |
| The bench can be rolled into a corner with the two saws on top. Everything else folds up and hangs on the wall. |